Grammy on the Go
By Karen Shadrach
The annual flowers are at their peak! A fun art activity to do with the grandkids this time of year is flower pounding. Flowers and leaves can be hammered to release their vibrant natural dye onto paper or fabric. We have made pictures to hang, book markers and thank-you notes. I did flower pounding on muslin fabric to save the pigment of my daughter’s wedding bouquet. The fabric was then sewn together with other contrasting fabric and made into a decorative keepsake pillow.
Great results come from flowers that are mostly flat and have a lot of color, such as rose petals, bright daisies, geranium petals, petunias and pansies. Dandelions work well also-they are not flat, but can produce an abundance of bright yellow color when pounded. Leaves from flowers such as geranium and marigolds will produce various shades of green, as well as ferns and vine leaves.
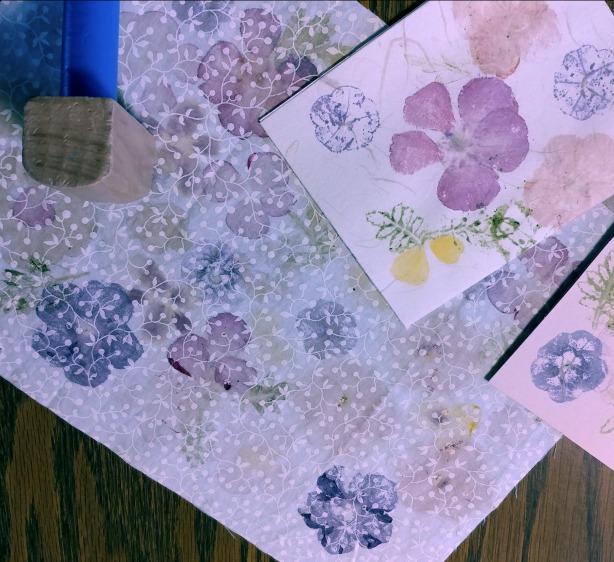
Many items can be used for hammering the plants. A flat rock, small mallet, hammer or rolling pin can all be used. Choose something that will best fit the child’s hand strength and abilities. I have a small mallet that I purchased at a craft store.
First, go out on a nature hike or a walk around your yard to collect different flowers, stems and leaves that ![]() you would like to try pounding. You don’t always need to pick the whole flower; just pluck off a few petals. Flat flowers with bright colors seem to give the best transfer. It’s also best to immediately pound the flowers right after picking. Fresh flowers work the best!
you would like to try pounding. You don’t always need to pick the whole flower; just pluck off a few petals. Flat flowers with bright colors seem to give the best transfer. It’s also best to immediately pound the flowers right after picking. Fresh flowers work the best!
Perform a trial pounding session, as you will find that some flowers are better than others and that some flowers transfer different colors than they appear. Make notes on which work the best and you can then go back and recollect them for whatever types and colors that will be part of your particular project. This is the fun trial and error portion of this activity!
To begin the actual flower-pounding process, lay your paper or fabric piece flat on the table surface or on a heavy book. Using a book may muffle some of the hammering noise. Remove the stem from the flower so that it lies as flat as possible. Actually, strip the flowers down to just petals only –remove stamens, pollen, etc. Place the flower petals face down on the transfer material. Cover the flower with a piece of paper towel and begin hammering! The grandkids love this part! Great for grandparents, too, as it is part craft and part stress release! You should see some of the color coming through the paper towel while pounding. When finished, gently lift up the paper towel. Most of the flowers and leaves will stick onto the towel. You can remove leftover debris by using a small spatula or a tweezers. Don’t try to brush it off, as it will create smearing and mixing of your colors.
After transfer, you may wish to fill in the flowers a bit. On fabric, you can embroider some embellishments or use a colored pencil dipped in water to add additional contrast. On paper, you can use markers, or color with crayons. The kids can add sparkled effects with glitter gel pens, or use glue and sprinkle glitter on top.
![]() If pounding many flowers and leaves at one time to create a specific design, place all your pieces facedown and use small amounts of regular scotch tape to hold everything in place.
If pounding many flowers and leaves at one time to create a specific design, place all your pieces facedown and use small amounts of regular scotch tape to hold everything in place.
Make flower pounding a treasured activity you will share with the grandkids before the summer ends!
Photos by Karen Shadrach

Michele Kennedy
Why did my just picked flowers become brown when hammered?
Ksren
Hi Michele!
The flowers you choose will occasionally produce different colors after pounding. For example, my very red petunias will be dark purple after pounding. A pink rose will give more of a rust color. If your flowers have a small pigment of green, these will also produce a brown color. Depending on what you are trying to make, always do a sample pounding for best wanted and expected results.
Enjoy the remaining days of summer!
Karen