Gardening Sweet Spots
By Donna Hessel
If you’d like to brighten up long, dreary winter days indoors with colorful, fragrant bulbs, start by choosing the right type of bulb. Bulbs that flower early in spring, such as daffodils, hyacinths and grape hyacinths are easy to force for indoor bloom. Crocuses and some types of tulips can be forced, too. You might want to try paperwhites or amaryllis. Catalogs that include bulbs often note which ones are best for forcing, along with helpful information about the number of weeks from planting to bloom.
Some bulbs require chilling before they can be forced. This mimics the natural process they would experience being in the cold ground throughout winter before blooming in spring. Without this cold period, the bulbs might not bloom properly. You can buy pre-chilled bulbs from catalogs, or chill the ones you find at the garden center at home. To pre-chill bulbs, such as hyacinths and daffodils, place them in a paper bag and put the bag in a refrigerator kept at 35 to 48 degrees F for 6-13 weeks. Buy bulbs that you need to chill in November or by early December for colorful flowers in January and February. Paperwhites and amaryllis bulbs do not require a chilling period.
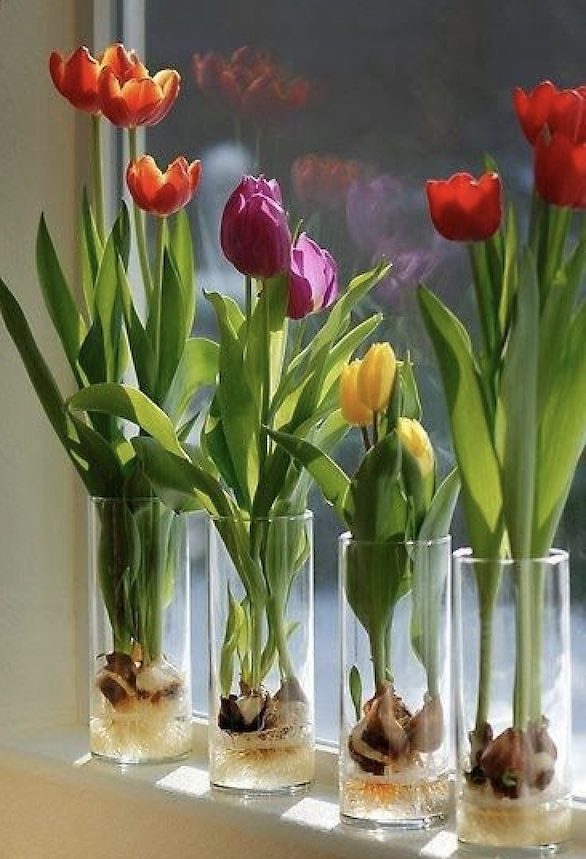
Bulbs can be forced in water or on a stone base. Forcing bulbs in water is probably the easiest way. Any floral vase, glass or jar can be used as a container. Set bulbs on a grid of wire or clear tape at the water line. Roots will form along the bulb’s basal plate.
Steps for forcing bulbs in water
- Fill the container with water to just touching the basal plate of the bulb. That bit of moisture will start roots forming. When roots form, keep the water line below the bulb to prevent it from rotting or molding.
- Place the container in a cool, dark spot for a few days until roots start forming and there is an inch or two of leaf growth.
- Move it into a bright spot with temperatures between 60 and 70 degrees F.
- A little sun in the morning or evening is beneficial, but avoid direct sunlight from a south window to prevent the water from getting too hot, which will cause buds to shrivel and dry up before they bloom.
- Rotate the container a quarter turn every day to keep the plant growing straight.
Forcing bulbs on stones
Rather than forcing a single bulb in a container, would you like a bunch of bulbs to provide more color? You will need a base in the container you select to hold the bulbs in place above the water level. Combining layers of different size stones or different materials makes an interesting display even before the bulbs bloom. Select materials such as pea gravel, river rock, crushed brick, glass chips or marbles to make an interesting base.
Steps for forcing bulbs on stones
- Set bulbs into the rock with a little push. Using pea gravel or smaller size rocks as the top layer will facilitate this. Add a few stones around each bulb to keep it from tipping. You don’t have to cover them. The roots will grow into the base material and hold them steady.
- Bulbs can be close, but keep them from touching to improve air movement and prevent mold from forming.
- Bulbs may heave out of place a bit if they have vigorous root systems; just tuck a couple stones around the bulbs to keep them stable.
Paperwhites – everyone’s favorite (or not)
![]() Paperwhites are the exemplary winter bulb to grow indoors. Either you love their fragrance or you hate it. There doesn’t seem to be any in-between position. You can force paperwhite bulbs in either water or on a stone base, a single bulb in single narrow container or multiple bulbs in a larger container. Tall containers will help to keep them from flopping, but here’s a tip you can use to keep them compact and sturdy. When leaves are one to two inches tall, replace the water in the container with a 1:8 alcohol-to-water solution. The addition of alcohol will stunt their growth just enough to keep the leaves from flopping. Tip the water out of the container before you add the alcohol-water solution. Measure carefully as too much alcohol will kill the bulbs. You can use vodka, whisky or rum – or you can use plain rubbing alcohol, which works just as well as the expensive stuff. Incidentally, you can toss the paperwhites after they have finished blooming. They will not bloom again if planted outdoors in a garden.
Paperwhites are the exemplary winter bulb to grow indoors. Either you love their fragrance or you hate it. There doesn’t seem to be any in-between position. You can force paperwhite bulbs in either water or on a stone base, a single bulb in single narrow container or multiple bulbs in a larger container. Tall containers will help to keep them from flopping, but here’s a tip you can use to keep them compact and sturdy. When leaves are one to two inches tall, replace the water in the container with a 1:8 alcohol-to-water solution. The addition of alcohol will stunt their growth just enough to keep the leaves from flopping. Tip the water out of the container before you add the alcohol-water solution. Measure carefully as too much alcohol will kill the bulbs. You can use vodka, whisky or rum – or you can use plain rubbing alcohol, which works just as well as the expensive stuff. Incidentally, you can toss the paperwhites after they have finished blooming. They will not bloom again if planted outdoors in a garden.
Plant Multiple Layers of Bulbs for Continuous Bloom
![]() Place a few inches of soil in a large container. Use a good potting soil and mix a time release bulb food or bone meal into each layer of the soil. Plant bulbs at about the same depth you would plant them outside in the garden; e.g., tulip or daffodil bulbs about six inches from the top of the container.
Place a few inches of soil in a large container. Use a good potting soil and mix a time release bulb food or bone meal into each layer of the soil. Plant bulbs at about the same depth you would plant them outside in the garden; e.g., tulip or daffodil bulbs about six inches from the top of the container.
When you pick the bulbs for your container, choose early, mid and late flowering bulbs for a succession of flowers. For example, plant a few early blooming crocus and snowdrops alongside early miniature daffodils with miniature iris. The early blooming crocus are placed above the later blooming bulbs. Place the largest bulbs upright on the potting mix, and then cover them with more mix. Place smaller, earlier blooming bulbs on the new, higher surface and cover these with soil too. Finally, add some small bulbs to the top of the container and finish with a layer of mix that is just below the rim of the container. Water the container well. For indoor planting, remember to pre-chill bulbs in your refrigerator before planting.
Buy bulbs now and pre-chill them so you can enjoy colorful blooms during the snowy and dreary days in January and February. Enjoy an early touch of Spring!
Article source: (Garden Gate Newsletter) Nov. 20, 2020-PUBLISHED: Dec. 10, 2019. Updated: Nov. 17, 2020; Layering Bulbs – Burpee.com/article 10928. Photos courtesy Pinterest.com.